I seem to be doing a lot of repairs on things which ordinarily wouldn’t be worth repairing at the moment. This is another one.
In the workshop I keep an old PC. It’s mostly used for reading PDF files of circuit diagrams and data sheets, and a few sundry tasks like audio editing and EPROM programming. One of the things I use it for is scanning. The scanner I’ve got (a Canon LiDE 30) works well, but isn’t really supported on any operating system later than Windows XP. The workshop machine is still running XP, so it does the scanning. Simples.
This morning I urgently needed to scan a document, so I went to switch the PC on. Pressed the button and…nothing. Check the power cable, check the socket, all OK. PC is dead. Not even the fan starts. Now I have a choice: fix the PC, or try and get the scanner to work on another machine. Visions of out-of-date drivers and endless reboots swam before my eyes, and I opted to fix the PC.
The symptoms were of a dead power supply, so I pulled it out of the machine and gave it a hard stare.

An ‘Advance MXA-300PTF’. Well. I read the warning, “Hazardous voltages contained withln this power supply not user service. Able returnto service center for repair.”, but it didn’t make any sense. The German version is even funnier. So I removed the screws and looked inside.
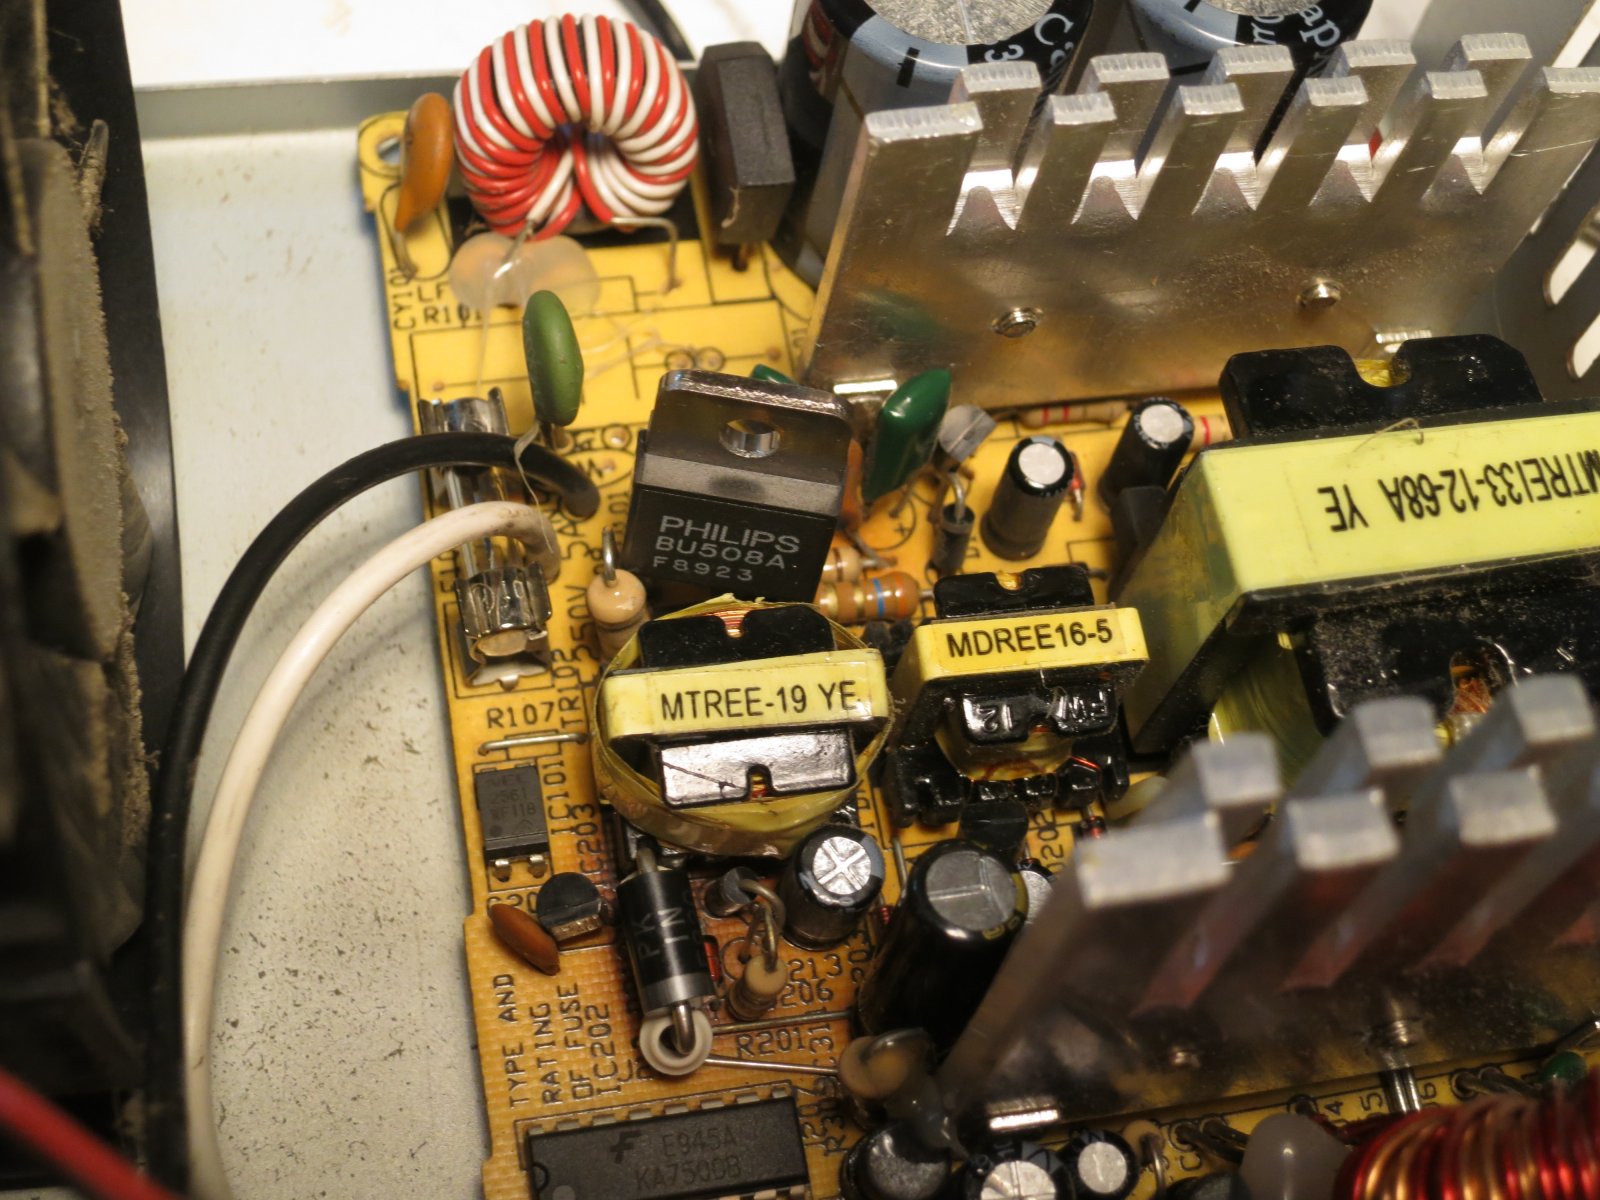
The mains fuse was blown. Not a good sign. There were signs of a struggle, too. Here’s a picture taken after I’d removed a few parts.

There’s an ominous burnt patch on the right of the PCB, and a lightly toasted section below it on the other side of the transformer. These parts all turned out to be part of the standby 5V power supply. If it’s not working, nothing will work, which explains why the PC was dead. The scorched patch was caused by a diode, which fell in to two pieces when I prodded it. The lightly toasted patch was from the switching transistor, which was short-circuit between all pins. The smoothing capacitor on the output of the 5V supply was bulging ominously, though it still seemed to have some capacitance.
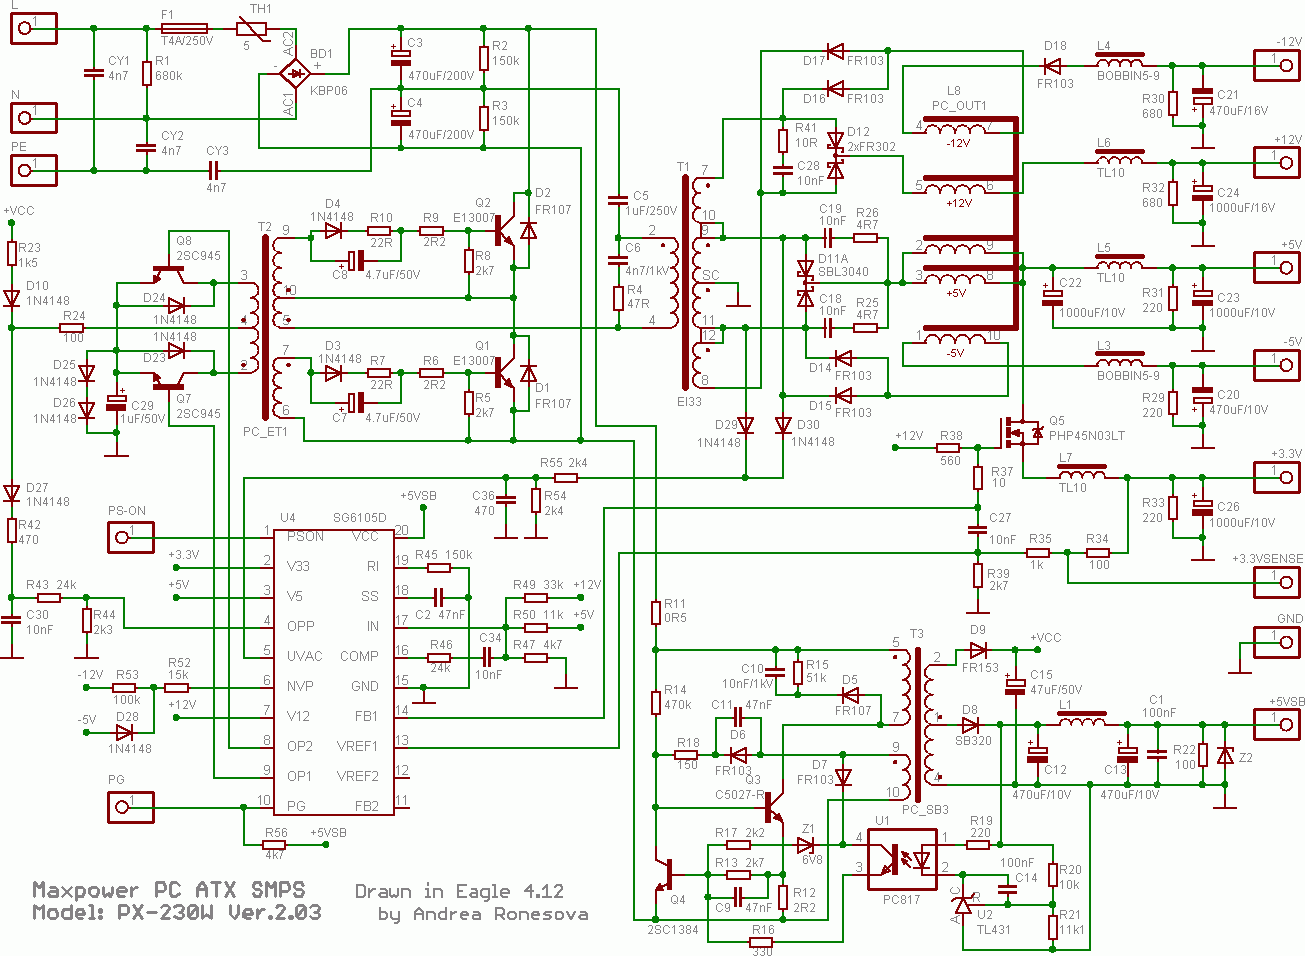
At this point I had a quick web search for likely circuit diagrams of PC power supplies. They’re mostly basically the same, especially at the (ahem) budget end of the market. Here’s the relevant fragment of the circuit diagram of a similar one (original source here from this very handy page of schematics). It’s remarkably similar to the DVD player power supply I wrote about a while ago:

Component designators I write here will refer to this diagram, not the original PCB. The burnt diode was D8, the short-circuit transistor was Q3, and the bulging capacitor was C12. I replaced all three, using a BU508A for Q3 – rather over-specified, but tough as old boots and I happened to have some. I fitted a new fuse, gingerly switched on and…nothing.
Since Q3 had clearly suffered badly, it would make sense if there was other damage on the primary side of the supply. Semiconductors are always suspect. Probing around, Q4 was dead, short-circuit all ways, and D7 was leaky in both directions. Replace them. I used a BC183 for Q4, with its legs crossed because it has a different pinout. Still nothing. Then I spotted that R12 (3.6 ohms in this power supply) was hanging by one lead because its other lead actually shared a PCB hole with the emitter of Q3! I hadn’t spotted it when replacing Q3. How cheapskate is that? It turned out to be faulty anyway, so I replaced it. By now the board looked a bit crazy with replacement components tacked on the back at all angles.

Switch on…and switch off again quickly! I had a meter connected to the +5V standby output. The meter was set to its 20V range and showed over-range. At least the thing was now working, but it clearly wasn’t regulating. I tried again, bringing it up slowly on the variac. With the mains voltage at about 30V, the output was already at about 6V, but at least it was stable and controllable.
I looked around at the feedback network. U2, a TL431 shunt regulator, was doing sensible things and seemed to be conducting when its input reached 2.5V, as it should. Using my bestest screwdriver to short the output (pins 3 and 4) of the optocoupler U1 should make the power supply think its output is too high and thus drastically reduce the output voltage, but it had hardly any effect. Odd. It turned out that R16 (220R in this unit) was almost open-circuit. Once it was replaced, my screwdriver test worked, but the output still didn’t regulate itself at 5V. This left only one suspect: the optocoupler U1. I scavenged a replacement from another scrap power supply (a cheapo USB phone charger) and fitted it. Success!

Now the output regulated at exactly 5V, according to the trusty AVO. I did a quick test of the rest of the power supply, pulling the PSON signal to ground. The fan started up and the output voltages were plausible. I decided that was good enough, and tidied up the repair.

Since the diode had clearly had a difficult time, I replaced it with a chunky 3A one (a 1N5420) on ceramic standoffs.
So what had gone wrong? Either the diode and output capacitor had died from a long-term overload (which reminds me, I must check how much current the PC draws from 5V standby) and the rest of the supply had burnt itself to a crisp trying to keep the output up, or the optocoupler had failed so the supply burnt itself and the output diode and capacitor to an even bigger crisp with a huge overvoltage. In the latter case, I’d be worried about the effect on the PC motherboard – the 5V supply could have been well over 5V, which wouldn’t do it any good.
With some trepidation, I reinstalled it in to the PC and switched on. Much to my amazement it worked, so the motherboard hadn’t been fried. Phew. All credit to Asus for an apparently indestructible board – an A7V266. Yes, it’s from 2002. That’s how old the PC is.
Just for fun, here’s a picture of the collateral damage.

Those nine components were all that was stopping me scanning my document.


