Monthly Archives: July 2013

Avometer 8 BLR121 15V battery replacement

The Avometer 8 multimeter has lots of useful ranges, including a special high-resistance range which can measure resistances of up to 20 megohms. This is handy, but it needs a special 15 volt battery. The battery it’s designed for is a BLR121, which was once fairly common but is now dying out. The BLR121 is just about still available but it’s expensive, and since the meter is likely to last a long time I wanted a battery which would also last, and be easy to replace when necessary.

DSCN8944

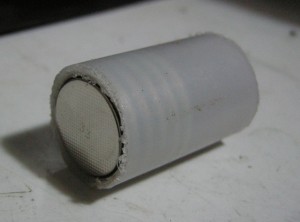
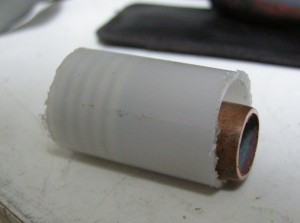
An old solder reel, a bit of copper pipe, and five common-or-garden lithium coin cells is all it took. The coin cells are CR2032, which are 20mm in diameter, and they fit just neatly inside the solder reel. I cut down the reel to form a tube about 35mm long. The stack of five cells is about 16mm long, so I filled the remaining space with a bit of copper pipe cut to about 22mm long. This is what the assembly looked like:

DSCN8946 DSCN8945

It fitted just neatly into the battery compartment of the meter. The spring contacts are very convenient because you can fit more or less any shape between them!

DSCN8947It works perfectly, and it’s cheap. The CR2032 cells are available for less than 50p each if you shop around, and they have a capacity of around 200mAh. The BLR121 replacements I’ve seen have a capacity of only 40mAh, so the lithium replacement should last about five times longer. Not bad.

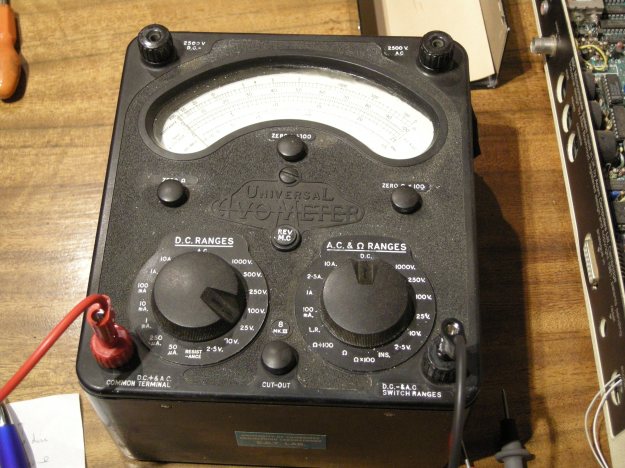
Here’s a gratuitous picture of the Avo in use checking the power supply of a BBC Micro.

DSCN8951


Cross-building for ARM on Debian squeeze and lenny

I have to support some software running under Debian Linux 5.0 (lenny) on ARM hardware. The operating system on this hardware can’t easily be upgraded because it’s expensive to get at physically, but there is a mechanism for updating the application it runs. This is an interesting problem in maintaining old software. The ‘stable’ releases of Debian have a reputation for being rather infrequent and almost out-of-date by the time they’re released, but in this case, a release every two years is too often! In embedded applications, having the latest and greatest doesn’t matter as long as it works and doesn’t change.

I have recently had to build a new release of the application software for this ARM hardware. My main Linux machine is now running Debian 7.0 (wheezy), which does a great job of cross-building for ARM, but unfortunately the resulting binaries are linked with libstdc++.so.6.0.17. The old lenny machines have version 6.0.10, which is too old to run these binaries.

For those not familiar with Debian Linux, the relevant versions go like this:

5.0 lenny (released February 2009)
6.0 squeeze (released February 2011)
7.0 wheezy (current as of July 2013)

I fiddled around for a while trying to install older libstdc++ packages under wheezy, but found myself in dependency hell, so I decided simply to revive an ancient PC which was already running Debian 6.0 (squeeze) and press it into service for doing the build.

Getting the ARM toolchain installed wasn’t hard. I had to add the line

deb http://ftp.uk.debian.org/emdebian/toolchains squeeze main

to /etc/apt/sources.list, and do

apt-get install g++-4.4-arm-linux-gnueabi

and it all worked. However, the code I was working on depended on a library, which I needed to install in its ARM version. There’s a handy tool, xapt, which will arrange this for you. However, it’s not natively available on squeeze but has been backported from wheezy, so I had to add

deb http://ftp.uk.debian.org/debian-backports squeeze-backports main

to /etc/apt/sources.list. Then

apt-get install -t squeeze-backports xapt
xapt -a armel libxxx-dev

and my library package was built and installed automagically. Nice.

However, this wasn’t enough. It turned out that I really had to build everything on lenny in order to get it to work – it seems that the libstdc++ from wheezy is compatible with squeeze, but neither wheezy nor squeeze is compatible with lenny.

First, I had to set up a lenny machine. This isn’t as easy as it used to be because lenny is no longer supported by Debian, and exists only as an archive. We should be grateful that it’s there at all. I set up a new virtual machine using VirtualBox and downloaded the last lenny netinst CD image (5.0.10) from archive.debian.org. There’s a problem during installation: it asks which Debian package repository it should use, but all of the available choices fail because the lenny packages aren’t there any more. The solution is to select ‘Back’ and allow it to continue without a repository. It complains, but it works. After it had rebooted, I manually edited /etc/apt/sources.list, commenting out the cdrom line and adding a pointer to the archive:

deb http://archive.debian.org/debian-archive/debian/ lenny main

Then I could install the packages I wanted (subversion, scons and other tools). Now to get the cross-building tools. Sorting out the ARM version of gcc wasn’t too hard. I added

deb http://www.emdebian.org/debian lenny main

to sources.list and was able to install gcc-4.3-arm-linux-gnueabi and g++. Apt complains about a lack of signatures, but that doesn’t stop anything working. I still had to get libssl-dev, though. The xapt tool doesn’t exist on Lenny so I had to use apt-cross, a tool which is an earlier attempt at doing the same thing:

apt-get install apt-cross

and add a source entry to /etc/apt/sources.list:

deb-src http://archive.debian.org/debian-archive/debian/ lenny main

then do

apt-cross -a armel -S lenny -u
apt-cross -a armel -S lenny -i libxxx-dev

and everything happened as it should. Now at last I could build my code and, with fingers crossed, run it on my embedded Debian Lenny machine.

I have to say that I think Debian’s support for cross-building is outstandingly good. Tools like apt-cross and xapt make it much easier than it could be, and the work continues with the multiarch project which improves support still further.

Avometer 8 repair

The Avometer 8 is a British electronics icon. For probably half a century it was the standard high-quality multimeter, found in every factory, workshop and laboratory. Though an analogue meter seems like an anachronism in today’s digital world, it’s still useful for some tasks, and there are decades’ worth of service manuals and test procedures which still call for measurements to be made using an Avo. They only stopped making them in 2008 because some parts were no longer available.

DSC_0570

This one was given to me by a colleague who got it as part of a deal when he bought a secondhand broken TV. I’m not making this up, I promise. It (the meter, not the TV) was made in 1964 according to the serial number. It really didn’t work when I got it. It read about 30% low on all ranges, the pointer kept sticking, and it hardly ever returned to the same zero point on the scale. I was on the point of scrapping it, but decided to save it because it’s got stickers on it from the lab I used when I did my degree, and I was encouraged by advice from the people of the UK Vintage Radio forum. I opened it up:

DSC_0566

It’s clear that everything is hand-built, and should be quite serviceable. The problems with this meter seemed to be in the movement itself – the sensitive, fragile coil suspended by precision bearings in a big magnet – rather than the electronics. The movement is so delicate that I was worried about wrecking it rather than fixing it! However, it’s only held in with two screws, so I could take it out and see what needed doing.

DSC_0568

In the picture above, the movement has been taken out and is standing on top of the rest of the meter. With the benefit of a little advice, and a very handy article from the Amateur Radio Relay League in February 1943 called ‘Rejuvenating Old Meters‘, I set to work.

The gap in the magnet in which the coil is suspended was full of tiny iron filings. They’re not supposed to be there. They get in the way, causing the coil and thus the pointer to stick, and they short-circuit the magnetic field, reducing the sensitivity of the meter. I cleaned them out in the recommended way using a little piece of Blu-tack.

The bearings suspending the armature were way out of adjustment: it rattled and caught on the centre pole-piece of the magnet, again making it stick. I adjusted the bearings, centring the hairsprings and the coil in the gap and just taking up the slack so it could move freely. The bearings in the Avo are sprung, so the armature is never quite rigid, but there should be no rattle in it.

Things were looking up, but there was still a problem. The movement wasn’t balanced, so the position of the pointer was very sensitive to which way up the meter was held. The pointer assembly has three little arms, one opposite the pointer and two perpendicular to it, to which it’s possible to add weights to balance the pointer. It’s a very delicate operation. You have to hold your breath while doing it, since the slightest draught sends the pointer swinging wildly. This picture, reproduced from the Rejuvenating Old Meters article, shows how the balancing is done. First, the meter is set to zero while lying horizontally. Then it’s turned to stand vertically. The tail weight is adjusted with the pointer horizontal, and the side weights are adjusted with it vertical.

meterbalance

I used paint applied in droplets with a tiny screwdriver to add weight. You can see it in this closeup of the movement.

DSC_0558

It doesn’t take much – the balance is incredibly sensitive.

Now to test it. The bare movement is supposed to take 37.5μA for full scale deflection. With a power supply and a resistor, I gave it a current of 37.5μA and it worked! I couldn’t tell whether it was exactly right because the naked movement is so sensitive to draughts that the pointer was never quite steady, but it was close enough for me.

I reassembled the meter, sticking the glass (yes, real glass!) back into the case as I went, and was delighted to find that it was now working – no sticking, it returned to zero every time, and was fairly accurate. It read about 1% low, though. That’s within its specification but I thought it could do better. Fortunately the Avo designers made the meter adjustable to fix such errors. There’s a shunt on the magnet which can adjust the magnetic field a little to compensate for the slight loss of magnetism as it ages. It’s the piece of metal with the slot in it, held by one screw, in this photo of the top of the movement.

DSC_0565

A couple of millimetres to the left was all it took, and the Avo now reads correctly to within 0.5%. Not a bad result, considering the only tools required were a screwdriver, a bit of Blu-tack, and some paint. Try that with a faulty digital multimeter!

Sony Xperia P (LT22i) Jelly bean battery drain

I have a Sony Xperia P (LT22i) phone. Sony have recently updated the software for it, so it now runs Android Jellybean. Last week, I plugged the phone into my desktop PC and the Sony software proudly announced that an upgrade was available. The existing (Ice Cream Sandwich) version had some niggly problems, so I thought upgrading was a good idea. Well, I was almost right.

xperiap

The software build it installed was 6.2.A.1.100. The upgrade proceeded without a hitch, but I soon noticed a problem: the phone’s battery life had become hopelessly bad. I used to be about to use it for 24-48 hours without charging, but now it would discharge itself by more than 50% overnight without even being used. That’s useless. Looking at the power management screen, the application using most of the juice was ‘Phone’. Phone? Surely that’s the one application that they must have tested, right? It turns out I wasn’t the only one with this problem. There are forum threads about it on various sites. Look at this one:

http://talk.sonymobile.com/thread/127636?start=0&tstart=0

After much cursing and head-scratching, I managed to fix it, but the fix isn’t very nice. Basically I used the ‘repair my phone’ link in the Sony PC Companion software, which does a factory reset and reinstalls the software. It’s brutal, but effective.

The process goes like this:

  • do a complete backup of the phone using the PC Companion software. Don’t be afraid of the incredibly long time it takes before it actually starts backing anything up.
  • select the ‘Support Zone’, then ‘Phone/Tablet Software Update’, then use the ‘repair my phone/tablet’ link and follow the instructions.
  • when your phone eventually restarts, get it connected to the internet either by Wi-fi or 3G. Add your Google account to it. Don’t try to restore the backup yet: most of it would fail because the apps aren’t installed yet.
  • on a desktop PC, go to play.google.com/apps and log in with your Google account. It should show, under ‘My Apps’, a list of apps previously installed on your phone. Click on them and set them to be installed.
  • the phone should now download and install the apps you’ve selected.
  • when the apps are restored, restore your backup using the PC Companion software. Again, there’s a long delay before anything happens, but it works eventually. Expect a few error messages if there are any apps you had installed before but chose not to put back. They’re harmless.
  • now spend ages getting everything set up the way you liked it before. Sadly the backup doesn’t keep things like your icon layout, wallpaper, notification settings, ring tones and myriad other little things.

This whole process wastes about half a day, in my experience, which is annoying. But at least my phone works properly again and doesn’t drain the battery. I just wish it hadn’t gone wrong in the first place. More testing needed, Sony, please.

Embedded serial port debugging on the cheap

I do a lot of electronics design and debugging. It’s how I make my living. Most of the things I work on involve embedded computers of one sort or another talking to various peripherals. It could be an 8-bit microcontroller sending data to a simple data logger, or a sophisticated 32-bit Linux system communicating with a wireless modem. Many of these connections involve asynchronous serial ports. If something goes wrong, as it usually does, It’s really useful to be able to see what’s going on with the communications. Here’s a picture of the sort of thing I’m dealing with. It’s a board I designed which contains a load of power electronics as well as a microcontroller and a USB data logger which talk to each other using a serial connection. Note the 175A fuse next to the USB connector!

DSC_0511

Monitoring a serial port on a PC is relatively easy, but the ones I deal with are separate from the PC, stuck on some circuit board on the workbench or buried inside a piece of equipment. To complicate matters, I need to monitor both directions of traffic at the same time, and have some idea of what order things happened in. There are many protocol analyser tools out there which will do all sorts of clever things, but it’s hard to justify them for small projects.

Faced with a such problem to solve recently, I put together a cheap and simple system which allows a developer to monitor both directions of an embedded serial port simultaneously, and have a record of which end transmitted what, when. It consists of a software tool and a bit of hardware.

Software

The software is a simple tool I wrote in C. It compiles and runs under Linux. Given the names of two devices, it opens both of them. It waits for a character on either of them and displays it on the screen in hexadecimal and ASCII. Each device has a separate column. Every time data arrives from the other device, it starts a new line. Each line is timestamped. In this way, it produces a dump of the conversation between the two devices, and it’s clear what order things happened in, and who said what.

It has one other handy feature: it has a ‘-l’ for (‘live’) command line option. In this mode, it will update the display every time a character arrives so you can see occasional data as it happens. This is great for monitoring things like keystrokes. This mode involves a whole load of backspacing and overprinting on the display, so it’s not really suitable if you want to record the output of the tool for later examination. The non-live mode is better for that – it outputs data only when it has a complete line.

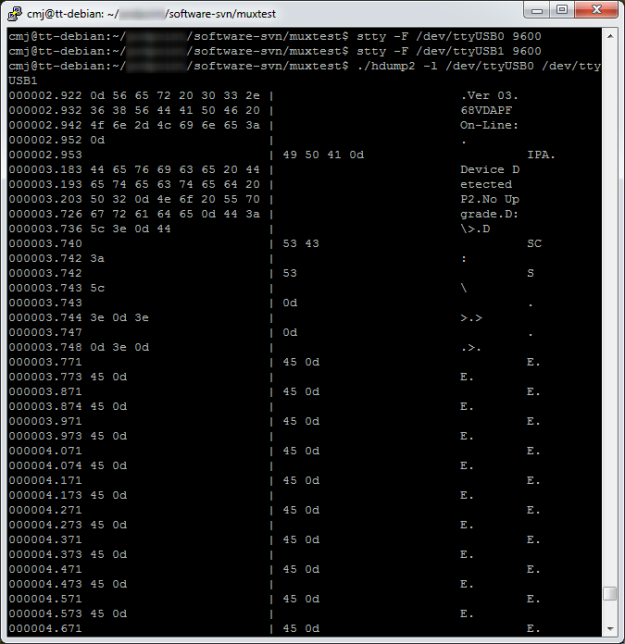
Here’s an example session using the software.

hdump2Here you can see that I used stty to set the baud rate of two serial devices attached to the PC. Then I ran the tool (provisionally called hdump2). You can see the data after that. The timestamps are on the left, followed by hexadecimal representations of the data, then the ASCII version. In this case we’re watching the initialisation of a Vinculum USB host controller. The data isn’t guaranteed to be in exactly the right order character-for-character, since it’s had to travel from two serial ports through the operating system, but it’s good enough for debugging.

The source is available to download here:

hdump2-1.0-source.tar.gz

To build it:

tar xzf hdump2-1.0-source.tar.gz
make

It’s free software, licensed under the GNU General Public License.

Hardware

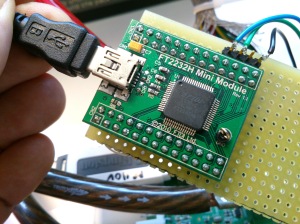
The hardware can be any pair of serial ports suitable to connect to the device under test, but I made a little module which makes it easier. It’s based on an FTDI FT2232H Mini Module. In fact, that’s all it is! There are just a couple of wire links to configure its power supplies and bring the receive pin of each of its two serial ports out to a connector. There’s a load of spare space on my board which I intend to use eventually to fit various useful connectors and buffers to hook up to the different serial port standards I come across.

DSC_0516

The wiring looks like this:

  • Join pin CN3-1 to CN3-3
  • Join pin CN2-1 to CN2-11 and CN3-12
  • serial input 1 is on CN2-10
  • serial input 2 is on CN3-25
  • input ground is on CN3-2 and CN3-4

When plugged in to a PC, two devices (typically /dev/ttyUSB0 and /dev/ttyUSB1, assuming you don’t have any other USB serial ports attached) appear. They can be used as the device arguments to the tool.

Do let me know if any of this is useful to you, or if you have comments or improvements to suggest or contribute.

BeagleBone Black Debian build from balloonboard.org

The Balloon Board project set out more than a decade ago to produce a high-performance, low-power, open hardware embedded Linux computing platform. It successfully did that, and now thousands of them are in use in all sorts of products all over the world.

One of the major achievements of the project was a build system which could configure, download, patch and build a boot loader, kernel and root filesystem using a relatively simple menu-driven interface. The menu allows the user to select which type of board to build for, and which customisations to apply. These can include custom kernel drivers for a particular application, or a different Linux distribution (Debian and Emdebian are supported). It doesn’t need an especially powerful machine to run on, but can make use of multiple CPU cores to speed up building.

My colleague Nick Bane has recently, in collaboration with Cambridge University Engineering Department, updated the build system so that it can build software for the Raspberry Pi and BeagleBone Black, both of which are somewhat newer hardware than the Balloon Board. This should make it easier to port software and device drivers between the boards without having to start with a completely new development system.

It might also be of interest to developers working with the Raspberry Pi and BeagleBone boards who want a simple, repeatable way to create the necessary software. This is especially important for use in manufactured products, where the process for creating a whole software distribution needs to be well understood.

This page describes my first attempts at building Debian Linux and the kernel for the BeagleBone Black. This is extremely preliminary, and it doesn’t work yet,

Software build options

Get the software:

svn checkout svn://balloonboard.org/balloon/branches/menuconfig2
make menuconfig
  • Mode Expert mode
  • Balloon Board BeagleBone Black
  • Choose which buildroot version to build -> Feb 2013
  • Select kernel version 3.8
  • make kernel-menuconfig
  • Select Kernel Features -> unselect Compile the kernel in Thumb-2 mode
  • make buildroot-menuconfig
  • Package Selection for the target -> Hardware handling -> Misc devices firmwares -> unselect rpi-firmware
  • Hardware handling -> unselect rpi-userland
  • Debian rootfs
  • Select kernel and module installation method -> Build Debian rootfs with kernel modules
make

Create Micro SD card

I used a 2GB card in a USB card reader connected to my Debian Squeeze PC. I created two partitions using fdisk. Partition 1 is a 50MB FAT16 (type 6) partition, and partition 2 is the rest of the card formatted as ext3 (type 83). On my system, the card appeared as /dev/sdc.

sudo mkfs.msdos /dev/sdc1
sudo mkfs.ext3 /dev/sdc2

Copy the files MLO, u-boot.img and uEnv.txt from the BeagleBone USB drive to the FAT partition.

Make uboot image

sudo apt-get install uboot-mkimage

In build/kernel, do

mkimage -A arm -O linux -T kernel -C none -a 0x80008000 -e 0x80008000 -n "Linux" -d ImageBoot uImage

copy uImage into /boot on ext3 partition

copy am335x-boneblack.dtb from /boot on the original BeagleBone Black board into /boot on ext3 partition

The board tries to boot, but kernel dies with a stack dump:

## Booting kernel from Legacy Image at 80007fc0 ...
 Image Name: Linux
 Image Type: ARM Linux Kernel Image (uncompressed)
 Data Size: 8750560 Bytes = 8.3 MiB
 Load Address: 80008000
 Entry Point: 80008000
 Verifying Checksum ... OK
## Flattened Device Tree blob at 80f80000
 Booting using the fdt blob at 0x80f80000
 XIP Kernel Image ... OK
OK
 Using Device Tree in place at 80f80000, end 80f88bac
Starting kernel ...
[ 0.113797] platform 53100000.sham: Cannot lookup hwmod 'sham'
[ 0.114013] platform 53500000.aes: Cannot lookup hwmod 'aes'
[ 0.114792] omap_init_sham: platform not supported
[ 0.114807] omap_init_aes: platform not supported
[ 0.156004] omap2_mbox_probe: platform not supported
[ 0.225933] Unhandled fault: external abort on non-linefetch (0x1028) at 0xf4
[ 0.233938] Internal error: : 1028 [#1] SMP ARM
[ 0.238662] Modules linked in:
[ 0.241861] CPU: 0 Not tainted (3.8.0 #1)
[ 0.246424] PC is at rtc_wait_not_busy+0x14/0x50
[ 0.251241] LR is at omap_rtc_read_time+0x10/0xa4
[ 0.256147] pc : [<c03eee84>] lr : [<c03ef490>] psr: 40000193
[ 0.256147] sp : df053d60 ip : 00000000 fp : c08b0f28
[ 0.268112] r10: df053e18 r9 : c07d31e4 r8 : df2b7000
[ 0.273560] r7 : df2b71c8 r6 : c08b0f28 r5 : c083a9cc r4 : 00000000
[ 0.280365] r3 : f9e3e000 r2 : 00000000 r1 : df053dc4 r0 : df101010
[ 0.287172] Flags: nZcv IRQs off FIQs on Mode SVC_32 ISA ARM Segment kel
[ 0.294880] Control: 10c5387d Table: 80004019 DAC: 00000015
[ 0.300873] Process swapper/0 (pid: 1, stack limit = 0xdf052240)
[ 0.307134] Stack: (0xdf053d60 to 0xdf054000)
[ 0.311684] 3d60: df053dc4 df053dc4 df053dc4 c03ef490 df2b7000 c03ebbd8 c08b0
[ 0.320217] 3d80: df2b7000 c03ec884 00000000 00000000 00000001 df053dc4 00004
[ 0.328746] 3da0: df053df4 c084fcd4 60000113 df2b54b0 00000000 00000000 80000
[ 0.337275] 3dc0: c084fcc4 00000000 00000000 00000000 00000000 00000000 00000
[ 0.345805] 3de0: 00000000 00000000 00000000 c084fe34 c08b0f28 00000000 00000
[ 0.354335] 3e00: 00000000 df101010 c07d31e4 df103640 c08b0f28 c03eba44 dfef0
[ 0.362866] 3e20: 60000113 df101080 df101010 60000113 00000004 60000113 0000c
[ 0.371394] 3e40: df101080 df101000 df101010 c08b0f30 df104cc0 c08b0f2c c07f8
[ 0.379923] 3e60: 00000000 df101044 df2ccb80 c084fe78 c084fdf4 df101010 df104
[ 0.388453] 3e80: c084fdf4 c08af648 c07d31e4 c07ddb14 00000000 c031e1cc c084c
[ 0.396982] 3ea0: df101010 df101044 c084fdf4 c031cf88 df052000 c031d014 00008
[ 0.405510] 3ec0: c084fdf4 c031b66c df045478 df104c80 df052000 df001840 df2c4
[ 0.414040] 3ee0: c0841ea0 c031bf14 c0725ca0 c084fde0 c084fdf4 c084fde0 c0847
[ 0.422570] 3f00: c0860608 c031d5fc c0860608 c084fde0 c07ddb4c 00000007 c086c
[ 0.431102] 3f20: c07ddb4c c07eff94 c07ddb4c c0008858 00000006 00000006 c0780
[ 0.439633] 3f40: 00000000 c07efcac c07eff94 c07ddb4c 000000dd c086060c c07a4
[ 0.448163] 3f60: c0860600 c07ac314 00000006 00000006 c07ac3f0 c0cc8d80 c0570
[ 0.456693] 3f80: c0577e98 00000000 00000000 00000000 00000000 00000000 00004
[ 0.465222] 3fa0: 00000000 00000000 c0577e98 c000e6d8 00000000 00000000 00000
[ 0.473751] 3fc0: 00000000 00000000 00000000 00000000 00000000 00000000 00000
[ 0.482280] 3fe0: 00000000 00000000 00000000 00000000 00000013 00000000 b637d
[ 0.490833] [<c03eee84>] (rtc_wait_not_busy+0x14/0x50) from [<c03ef490>] (om)
[ 0.500636] [<c03ef490>] (omap_rtc_read_time+0x10/0xa4) from [<c03ebbd8>] (_)
[ 0.510257] [<c03ebbd8>] (__rtc_read_time+0x58/0x5c) from [<c03ec884>] (rtc_)
[ 0.519423] [<c03ec884>] (rtc_read_time+0x30/0x48) from [<c03ecad4>] (__rtc_)
[ 0.528773] [<c03ecad4>] (__rtc_read_alarm+0x1c/0x290) from [<c03eba44>] (rt)
[ 0.538858] [<c03eba44>] (rtc_device_register+0x140/0x268) from [<c07d3358>])
[ 0.548850] [<c07d3358>] (omap_rtc_probe+0x160/0x3b8) from [<c031e1cc>] (pla)
[ 0.558576] [<c031e1cc>] (platform_drv_probe+0x1c/0x24) from [<c031cdec>] (d)
[ 0.568657] [<c031cdec>] (driver_probe_device+0x80/0x21c) from [<c031d014>] )
[ 0.578459] [<c031d014>] (__driver_attach+0x8c/0x90) from [<c031b66c>] (bus_)
[ 0.587902] [<c031b66c>] (bus_for_each_dev+0x60/0x8c) from [<c031bf14>] (bus)
[ 0.597431] [<c031bf14>] (bus_add_driver+0x178/0x23c) from [<c031d5fc>] (dri)
[ 0.606963] [<c031d5fc>] (driver_register+0x5c/0x150) from [<c031e58c>] (pla)
[ 0.616948] [<c031e58c>] (platform_driver_probe+0x1c/0xa4) from [<c0008858>])
[ 0.626936] [<c0008858>] (do_one_initcall+0x2c/0x164) from [<c07ac314>] (ker)
[ 0.637019] [<c07ac314>] (kernel_init_freeable+0x108/0x1e4) from [<c0577ea4>)
[ 0.646648] [<c0577ea4>] (kernel_init+0xc/0x164) from [<c000e6d8>] (ret_from)
[ 0.655452] Code: e59f6038 e59f5038 e3a04000 e5963000 (e5d32044)
[ 0.661858] ---[ end trace 33e6cc13d62fdb11 ]---
[ 0.666954] Kernel panic - not syncing: Attempted to kill init! exitcode=0x0b
[ 0.666954]