History has been kind to the Chinon FZ506 floppy disc drive. A lot of them seem to have survived. Though they don’t have the aspirational cachet of the Teac FD55, they seem reliable, and I’ve found that of the working or repairable floppy drives that have passed through my hands, a lot of them have been the Chinon ones. That includes the pair of BBC Micro drives referred to in this article.
A reader recently asked how the 40/80 track switching on those drives worked. It doesn’t look like it’s an original feature of the drives, but it’s one that was very useful on the BBC Micro. Back in the day it was common to find discs in both formats. However, most Disc Filing Systems for the Beeb, with the notable exception of the Opus DDOS, didn’t have a means of switching between them in software. So it had to be done in hardware. There were various ways of doing it: some drives needed a simple link wired to a switch, some had more complex modifications, and others used external electronics to add extra step pulses, turning an 80-track drive into a 40-track one. The Chinon FZ506 drives here seem to have a custom modification.

I was curious to see how it’s done so I took the top cover off the drive. There’s a double-pole double-throw slide switch on the front panel, wired up in a slightly odd-looking way, with four wires heading to various points on the drive’s circuit board.


On the circuit board there are a couple more wires added and a transistor and resistor soldered on in one place.

I sketched out the circuit.

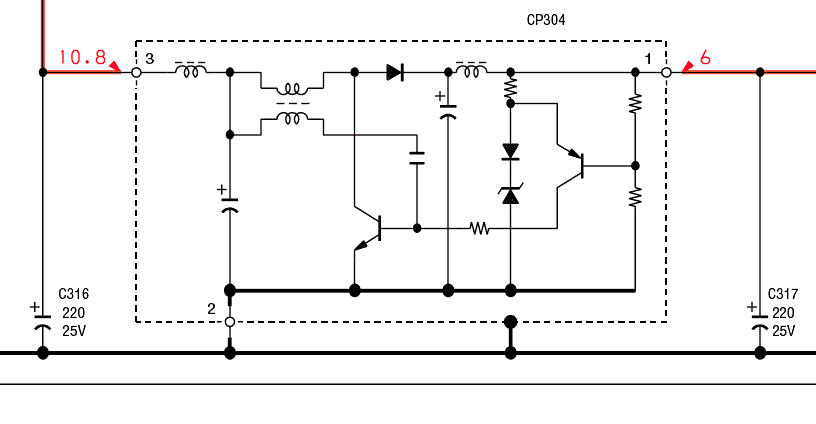
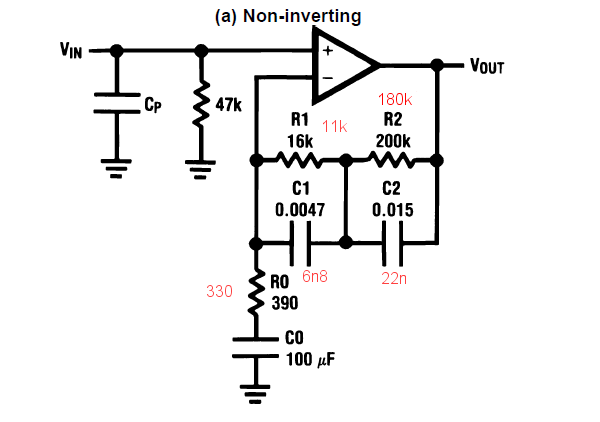
To understand what’s going on, it would be useful to be able to see the circuit diagram of the drive. Fortunately it’s available, and I attach a copy here for reference, with the relevant signals highlighted in the red ellipses.

Looking carefully at the modification and the original circuit diagram, it’s almost clear what’s going on.

One half of the switch is wired to connect two different pins on the controller chip to ground in the 40 and 80 track modes. One of them, FWSEL0, is grounded by a link J1-9 anyway, so will have no effect. But the other, /TWSTEP, switches the controller into and out of double-stepping mode, which is the important function.
The other half of the switch is a bit cunning. At first sight, it looks like it won’t do anything much: it grounds the base of the transistor in both positions, so why is it even there? The answer is a subtle: for an instant while the switch is between positions, that connection to ground is broken, which allows the transistor to switch on and drive the controller chip’s reset signal low for a moment. So it’s a way of generating a reset pulse each time the switch changes position.
Perhaps that’s necessary to force the controller to re-read the state of the double-stepping signal, or maybe it makes sure that 40 track mode always steps on tracks 0/2/4/6… and not on 1/3/5/7… after coming out of 80 track mode. In any case, it explains the slight ‘clunk’ the drive makes each time the 40/80 track switch is operated.
The mystery of how the 40/80 track switching on the Chinon FZ506 is thus solved. Using this information, it shouldn’t be too hard to add it to unmodified drives.