One of my most-used tools on the workbench is my Fluke ’12’ multimeter. I’ve had it almost 20 years, and it’s my favourite meter because it was clearly designed by someone who had to fix things. It’s rugged, especially in its bright yellow holster, and has so many thoughtful features: it has big buttons and a switch, instead of a rotary knob, so it’s easy to use with one hand. It autoranges quickly and reliably. In continuity and resistance modes, it automatically switches to measuring voltage if it detects one, so you don’t need to worry about changing ranges when debugging things. It doesn’t have fiddly extra features. It doesn’t even have a current range, because it would make no sense: measuring current usually involves breaking a circuit, which you can’t easily do when working on a circuit board. It switches itself off when unused for half an hour or so, saving the battery.

It’s been completely reliable apart from needing a new set of test leads last year (for the first time). However, recently the big, chunky buttons had become reluctant to respond, and needed firmer and firmer presses until they didn’t work at all. That meant I was stuck measuring either DC voltage or continuity. Time to pull it apart and see what’s wrong.
Removing the test leads and holster, then taking out the four screws, reveals the view you get when changing the battery. I’m sure Dave at EEVBlog, master of the multimeter teardown, would approve. Lots of chunky components and very solid construction.

The PCB is held in by the plastic clips at the top and sides. Easing them back lets it and the plastic frame underneath it come out:
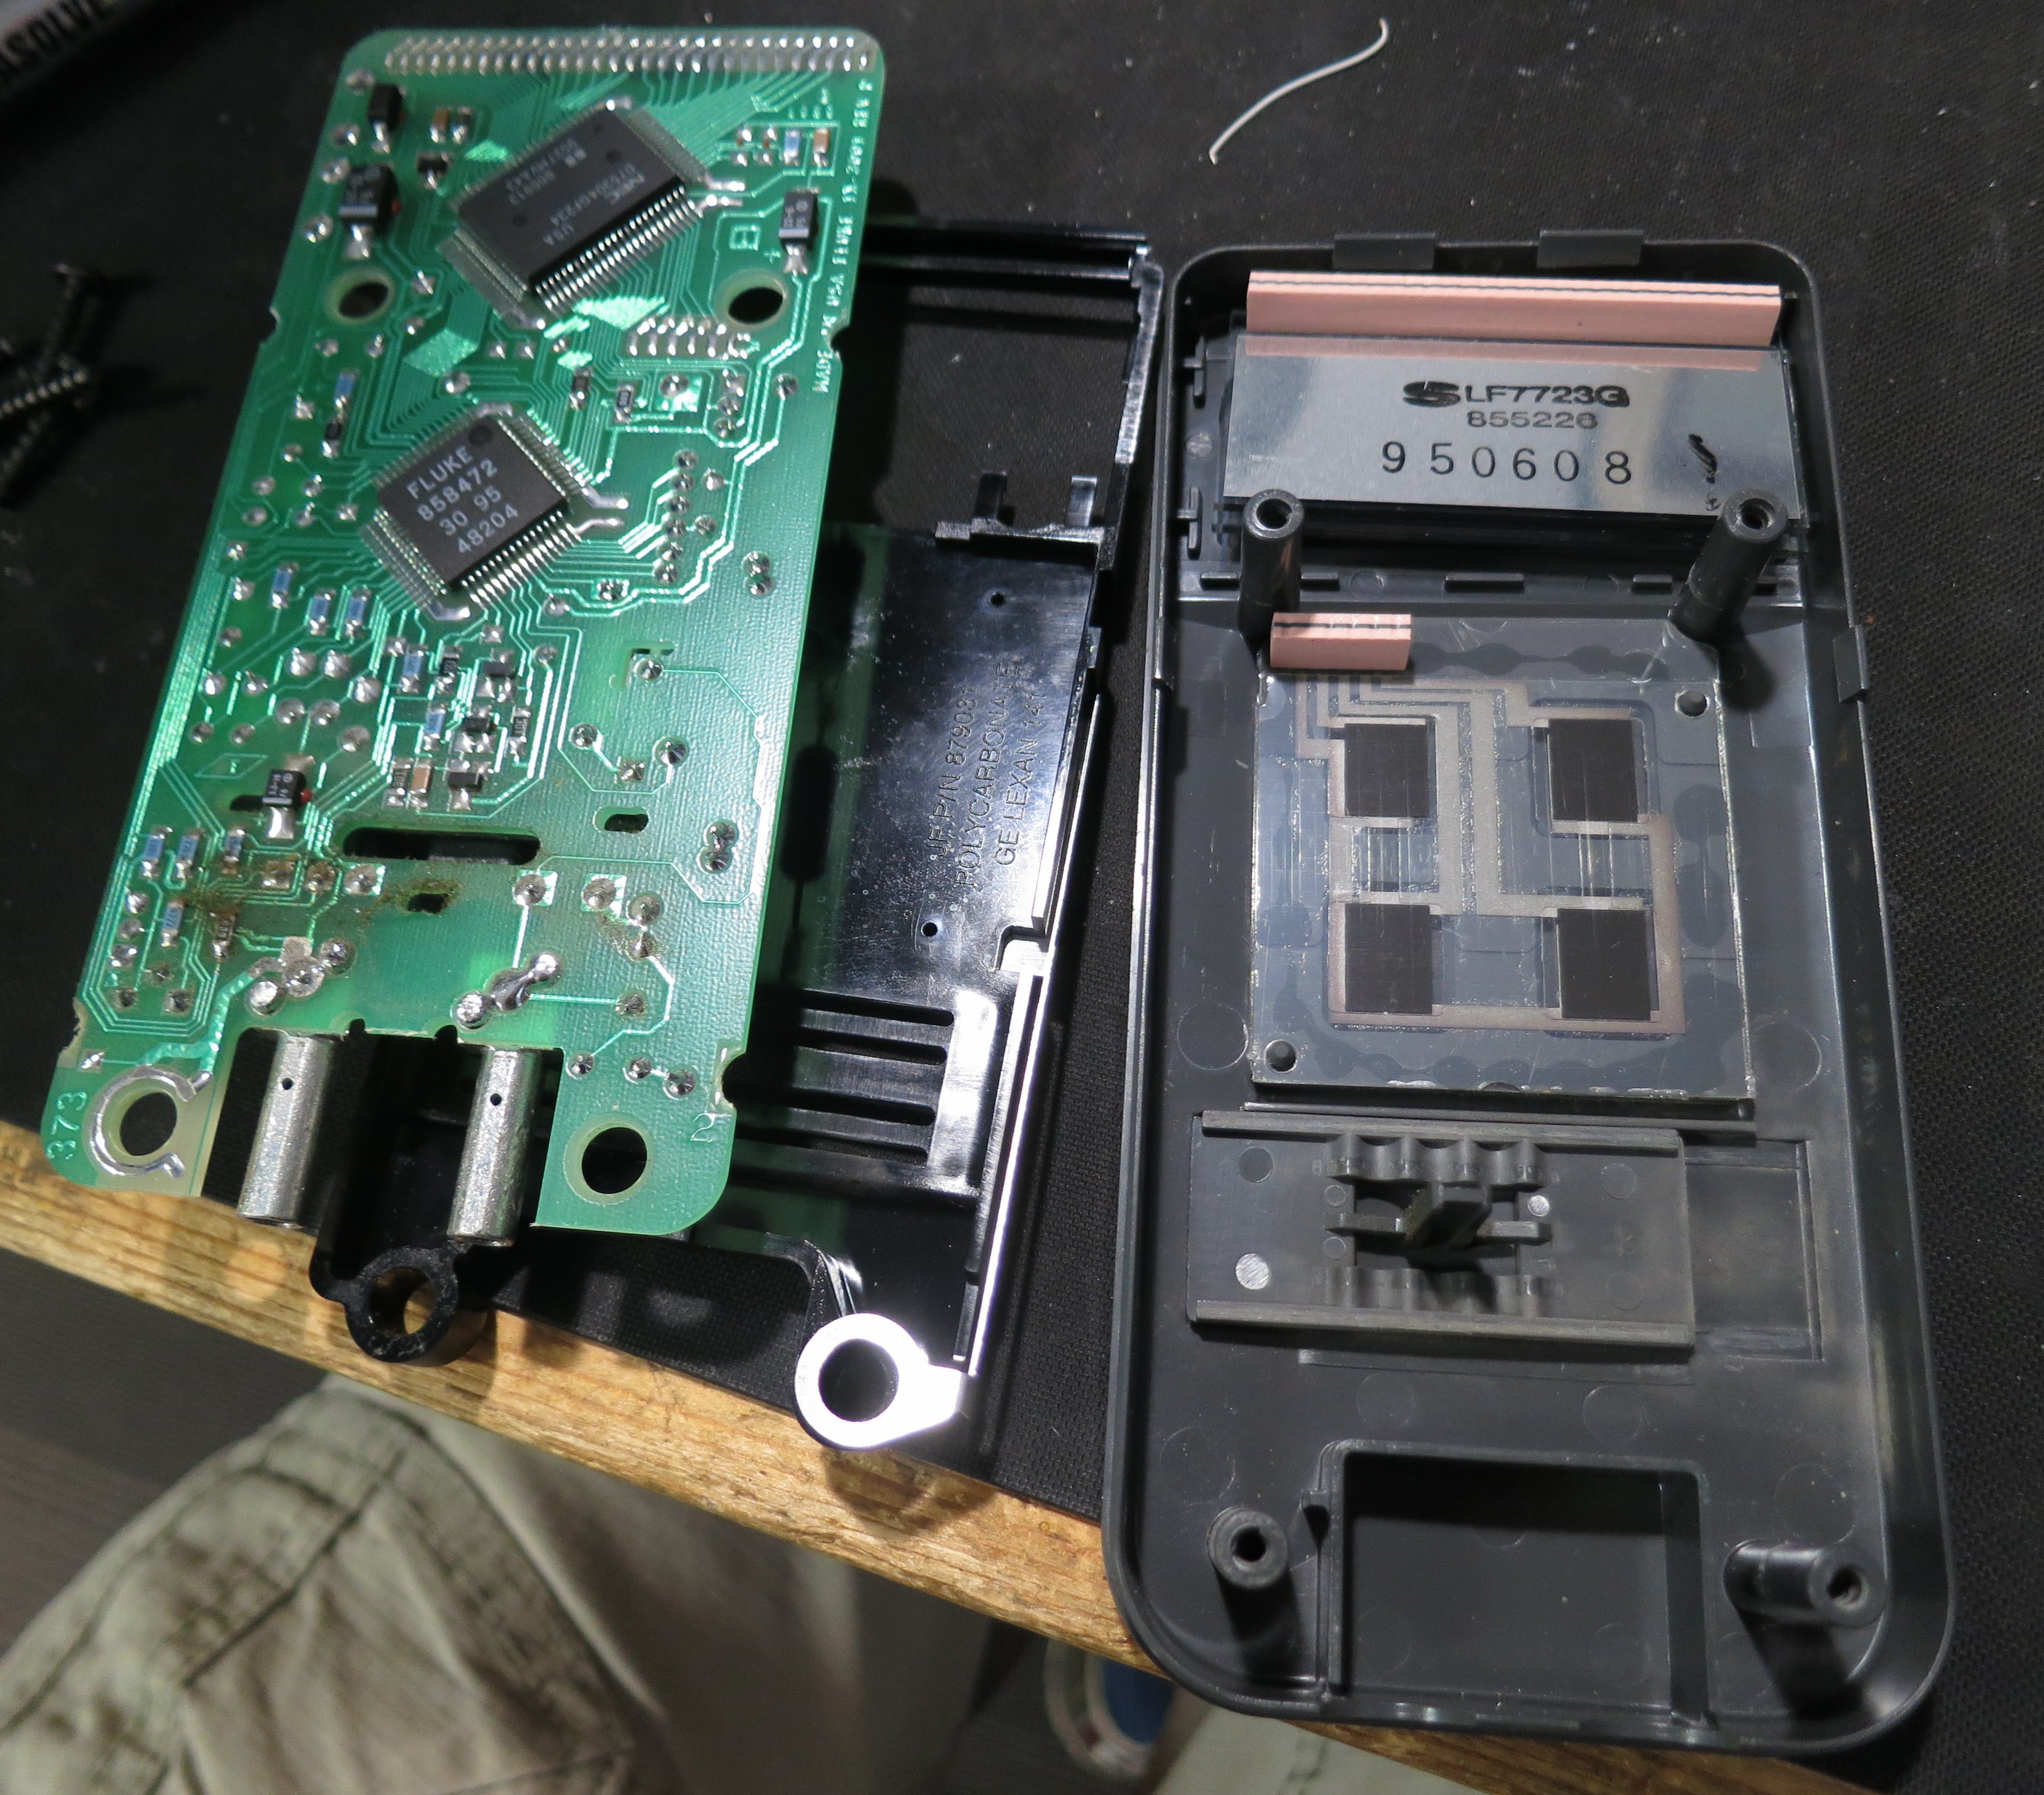
The black plastic internal frame (under the PCB in this photo) is marked as being made of polycarbonate, so it’s very strong. None of that high-impact polystyrene rubbish. It’s nice that the membrane for the buttons bears against the frame, not straight against the PCB. This is nice industrial design.
The button membrane is connected by a zebra strip to the PCB. The PCB itself looks nice and clean, and the zebra strip is OK, but the contacts on the membrane look tarnished.

I wanted to test the membrane using the continuity check function of my trusty Fluke 12…oh, hang on, it’s in pieces. Break out the equally trusty Avo 8.

The membrane itself works fine. I cleaned up the contacts using DeoxIT D5 on a piece of paper. I also cleaned all the plastic parts, including the holster, in the office sink with washing-up liquid. Here’s the result, showing resistance mode to prove that the buttons work.

Looking good, working as well as it did when new, and ready for the next 20 years.

I would be curious to know if it’s still working? I have one whose failure seems to be breakdown of the zebrastrip …and Fluke doesn’t have replacements.
Yes, it’s still working and in daily use. Is it the zebra strip to the display that’s failed? That’s probably a fairly standard part. I know the displays themselves have a reputation for dying. Mine’s OK but one segment is a little dimmer than the others.
Hello for the segment wich is clear, have you you try to fix it?
I have fixit it on the same Fluke using a rubber (for pencil) and moove 2 /3 times on the rubber lcd contact (light moove)
And on the contacts / solders opposite on the card
and you will see segment as new right after that…
It was only bad contacts
Hope it will be ok for you and the 20 next years….
best regards
I haven’t tried to fix the dim segment, but thank you for the advice. That sounds very useful and I’ll try it next time I have the meter open.
Thanks for the fix/post!!
The Fluke is good. My pick is Fluke 115 Compact True-RMS Digital Multimeter. Thanks for sharing.
Thanks for taking the time to post this solution. I cleaned the contacts and zebra strip and my buttons are back to working.
One note I would add is that you need to screw the case back together to test. When I just slid the case back together and tried it thereally must not have been enough compression on the zebra connection; but once put the sceway back in and tightened all was good.
Yes and sometimes even with screws tighted at maxi, there is an other problem on the buttons
The panel with the 4 buttons sometimes doesn’t touch the second little rubber, so it’s no more possible to change the function for one the buttons
My solution is to remove the panel (4 buttons) and to use a wood toothpick (2 mm thickness and no expensive cost…)
Slip the piece of wood between the case and the panel button. This pull up a little and gently the contacts of the buttons toward the little rubber. The contact is good then and all run as usual.
I tried to find this kind of rubber but it seems to be difficult to find the same..
This solution saves the Fluke 12…another time..
best regards Eric. 😉
When i said “slipe the piece of wood” here is a precision
At the upper side of the buttons there is a little slot all around
You put the piece of wood against this slot, external of the panel, screen side
This raise “a little” the four contacts, this is to compensate the size reduction of the little rubber
Best regards Eric. 😉
Bonjour,
Fluke 12 j’ai glissé entre la nappe et le caoutchouc des 4 boutons un morceau de feuille cartonnée et ça marche ! pour combien de temps ???
Cordialement Jean Pierre
Felicitations! Je suis heureux, que votre Fluke marche encore bien.
Hi what was the original price of the fluke 12?, i’ve found a brand new one in my garage and have no idea where it came from.
I don’t know the original price, I’m afraid. Mine was a gift to me decades ago so I never knew the price.
I inherited my Fluke 12 with my bench and I’ve grown to love it. I never knew exactly why, but you described it perfectly in the paragraph at the top. I can just use one hand to do everything. Rotary knob ‘other’ meters are fiddly and difficult to work. It’s durable and the rubber holster is great for protecting it. I would get another just like it if this one went missing from my life. I was just searching about for other Fluke meters and found your blog. Nice work on the fix. I know now what the inside looks like and what may go wrong, if my Fluke ever flakes, haha. Great to see others appreciating such a great logical design.
Glad to hear you liked the post, and the meter. I used it today at my own bench so it’s still in action.
I had a problem with my Fluke 11. I like it very much, it’s accurate and very easy to handle, but the display was dimming and the buttons also were not working properly, I had to push very hard. I tried cleaning the zebra strips, contacts etc., all to no avail.
I noticed there were indents all along the zebra strips, at the location of the contacts, and I thought those must be the problem.
I then touched up all contacts with my trusty Weller soldering iron, using a thin Multicore solder. After removing the resin between the contacts and cleaning them with alcohol the Fluke 11 worked perfectly again.
I have a Fluke 12 and 87. My Fluke 12 will not read ac voltage. What do you think may be the problem?
I don’t know, I haven’t had to examine the 12 in that much detail, I’m afraid.